
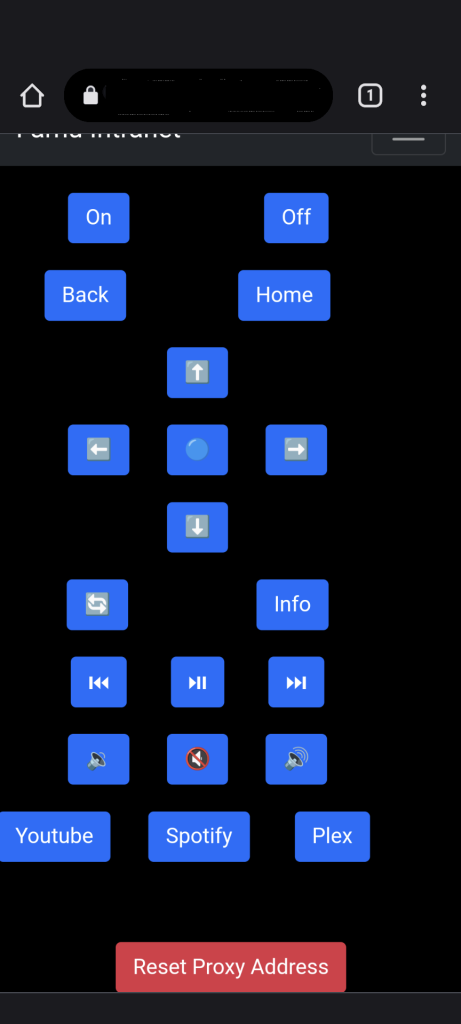
I’ve recently made a fun little webpage that doubles as a remote control for my new Roku TV. It works by sending External Control Protocol (ECP) messages to the TV’s onboard API via a secure CORS Proxy I’ve setup on a raspberry pi on my LAN.
Overview / How It Works
So the remote webpage lives on one of my sites, https://intra.example.com/tv_remote. Which is an internet accessible page. But I keep it password protected and use it as a collection of online resources for myself and some friends. You can find the source of the tv remote page on my github, linked below.
Roku TV Remote WebPage Source
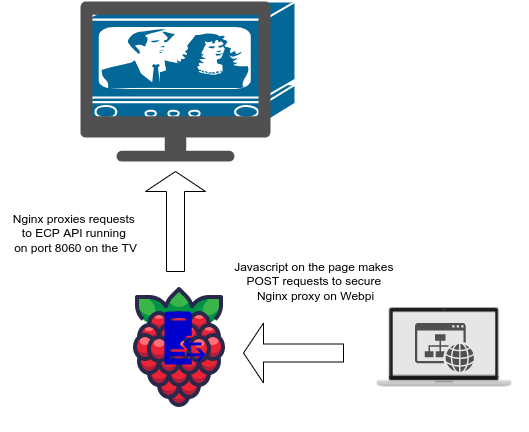
The roku remote page is just HTML and Javascript. The way it works is, the JS embedded on the page sends XHR POST request’s to the secure CORS proxy which then relays those ECP commands to the API hosted on the TV itself. The reason for the CORS proxy is, CORS. AKA browsers will NOT allow JS on any random web page to make POST requests to some resource on someones LAN unless a few pre-requisites are met.
- The HTTP requests must be secured via SSL (encrypted).
- The endpoint must explicitly allow requests from the origin.
Diagram
TV Setup
To make this work you have to first enable developer mode by entering the konami code on the TV’s real remote. After setting up developer mode and entering a password the TV’s ECP API will be online.
Router / LAN Setup
On your router / local DNS server you’ll want to configure a static IP entry for your raspberry pi and your TV. From there you’ll want to assign a DNS hostname to your pi so it can have a domain name on your LAN. I’ve named my pi “webpi”.
Setting Up Nginx As A Secure Reverse Proxy for CORS On A Raspberry Pi
Nginx is great for if you just need a quick and simple LAN-side reverse proxy.
On a blank raspberry pi you can install Nginx with the commands below.
sudo apt update && sudo apt upgrade -y
sudo apt install nginx
From there you can configure Nginx to work as a reverse proxy by creating a new virtual host conf. I named my virtual host conf after the name of my raspberrypi (webpi). You can name yours after whatever you call your pi on your home network.
The main conf files for nginx hosts go here, /etc/nginx/sites-available. If you’re not familiar with using vim as your text editor, use pico.
vim /etc/nginx/sites-available/webpi.conf
In that file put the following.
server {
  listen 80;
  listen [::]:80;
  server_name webpi.example.com;

  root /var/www/html;
  index pihole/index.php index.php index.html index.htm;

  charset UTF-8;

  if ($scheme = http) {
      return 301 https://$server_name$request_uri;
  }

}

server {
  listen 443 ssl http2;
  listen [::]:443 ssl http2;

  root /var/www/html;
  server_name webpi.example.com;
  autoindex off;

  index pihole/index.php index.php index.html index.htm;

  charset UTF-8;

  if ($scheme = http) {
      return 301 https://$server_name$request_uri;
  }

  location / {
      expires max;
      try_files $uri $uri/ =404;
  }

  location /tv_proxy {
      if ($request_method = OPTIONS ) {
          add_header Content-Length 0;
          add_header Content-Type text/plain;
          add_header Access-Control-Allow-Origin $http_origin;
          add_header Access-Control-Allow-Private-Network true;
          return 200;
      }

      proxy_pass http://YOUR_TVs_LAN_IP:8060/;
      proxy_set_header Origin http://intra.example.com/;
      proxy_hide_header Access-Control-Allow-Origin;
      add_header Access-Control-Allow-Origin $http_origin;
  }

  location ~ /\.ht {
      deny all;
  }

  ssl_certificate /etc/letsencrypt/live/webpi.example.com/fullchain.pem;
  ssl_certificate_key /etc/letsencrypt/live/webpi.example.com/privkey.pem;

}
This setup requires that you get an SSL certificate for the name webpi.example.com (or whatever the name is in your case). I’m using Let’s Encrypt to get these certificates. Let’s Encrypt requires that you verify domain ownership before they’ll issues a certificate for your domain. There are a few ways to do this. However, for this purpose I would advise using Let’s Encrypts DNS challenge, as the raspberry pi in this case shouldNOThave ports forwarded / be WAN accessible.
The tool used to install Let’s Encrypt certs is called certbot. You can install certbot on the pi with the following command.
sudo apt install certbot
From there you can run the certbot in manual mode to do a DNS challenge.
sudo certbot certonly --manual \
        --preferred-challenges=dns
        --register-unsafely-without-email
        -d webpi.example.com
That will then spit out a string of random text that must be entered as a TXT record within your domain’s DNS. Once the DNS TXT record has been added and has propagated across the global internet, (could take hours depending on your domain’s DNS TTL value), you should be able to hit enter and get a message like the following.
IMPORTANT NOTES:
 - Congratulations! Your certificate and chain have been saved at:
   /etc/letsencrypt/live/webpi.example.com/fullchain.pem
   Your key file has been saved at:
   /etc/letsencrypt/live/webpi.example.com/privkey.pem
...
From there you should be able to start / enable Nginx.
sudo systemctl enable nginx
sudo systemctl start nginx
And then if you visit webpi.example.com in a browser from a device on your LAN you’ll see the XML output of the TV’s API.
Setting Up The Webpage
Lastly, on either an internet accessible site or on a site on your LAN you’ll want to add a folder for roku_remote and then copy in the code from my github. When you initially visit the page you’ll be greeted with a message explaining you have to enter a proxy address. After entering the name of the CORS proxy server (webpi in my case), the site will then work as a fully functioning TV remote for a Roku TV.
In Conclusion
Although modern browsers try to dicourage it for security reasons it is possible to use Javascript to communicate with devices on your LAN as long as there is a secure CORS proxy setup in between. This project is a fun little useful example of that in practice on my LAN. Thanks for reading!